8 – Techniques for Creating Exercises
Translated from the Turkish original. Read the Turkish original.
Very Boring Music Lessons 8- “A Few Techniques for Creating Exercises”
WARNING: According to a bulletin issued by the CSE (Jazz Standards Institute), knowing theory in the abstract, failing to apply it on your instrument and, above all, failing to HEAR it may cause dryness in playing and writing, unnecessarily intellectual-sounding results and confusion. To prevent these side effects, everything learned in theory must be played, sung -even if your voice is terrible- and, by whatever means necessary, HEARD. Or you should skip this theory business altogether and, as has been possible throughout Music history, learn Music simply by listening to recordings/ playing/ learning directly from masters (if there happen to be any around). Otherwise, our institution accepts no responsibility for any complications that may develop later.
It is absurd, of course, for my first column in the first issue of a new magazine to start at number 8, but there is a reason: about 10 years ago I used to write “Very Boring Music Lessons” in “Jazz” magazine, and had to stop after lesson 7. (You can find these lessons at www.caglayanyildiz.com.) I think enough material to write about has accumulated in 10 years, so I am picking up where I left off.
The world of Music publishing is overflowing with thousands of books of patterns, technical exercises and scale-harmony relationships. (And most of them are now just a “Download” button away.) The defining feature of the vast majority is that, rather than teaching you “how to fish with a single book”, each book “gives you a single fish”; that is, it hands out “ready-made information” by spreading over a few hundred pages material that could really be summed up in a few…. Then it publishes the book’s second, fifth and tenth volumes, and keeps handing out a fish a day… When we “read” and play these books, our fingers and eyes usually do the work, but most of us never think about what the content we are practising is, or how it was produced. That is why, when we improvise or compose, this material does not find its way into our Music by itself.
In this column I will try to write a “how to fish” lesson on how to practise “any musical material” effectively, though I already doubt that I will manage it…
To begin with, since the octave is divided into 12 in Western Music, the most effective way to practise and fully absorb “any musical material” is, of course, to practise it in 12 keys. For this, “all possible root movements” must be used. (Even if my mumbling makes no sense right now, the 3 people who keep reading patiently will understand it shortly.. well, I hope so..)
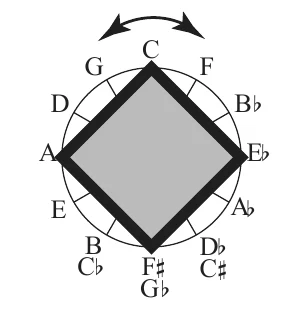
For a more symbolic and systematic explanation (or to confuse you), we will use two circles:
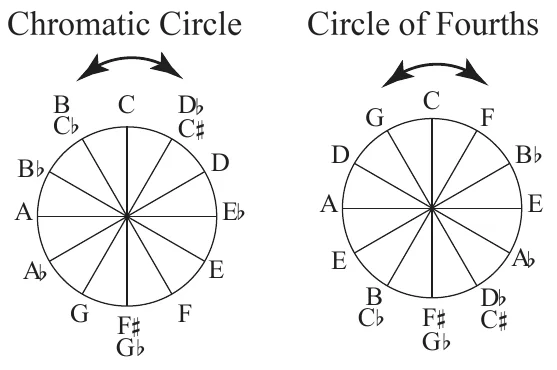
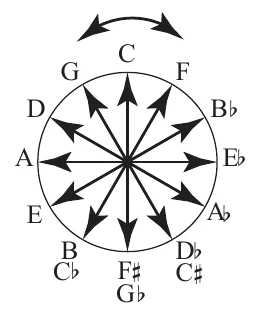
The chromatic circle is made of half steps, while the Circle of Fourths is made of “Perfect Fourths”. The “arrows” show that the circles are to be read both clockwise and counterclockwise. (stating the obvious is one of my hobbies) A circle is a good shape because you can start reading from any point in any direction and end up back where you started, having practised “all possible root movements”.
The number 12 (and so, naturally, 1 octave) divides exactly by 12, 6, 4, 3 and 2. If we begin working out “all possible root movements” by dividing 1 octave into 12:
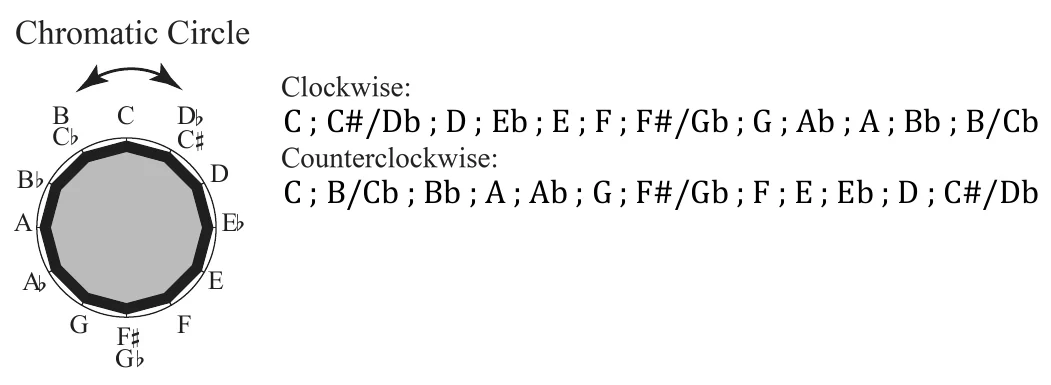
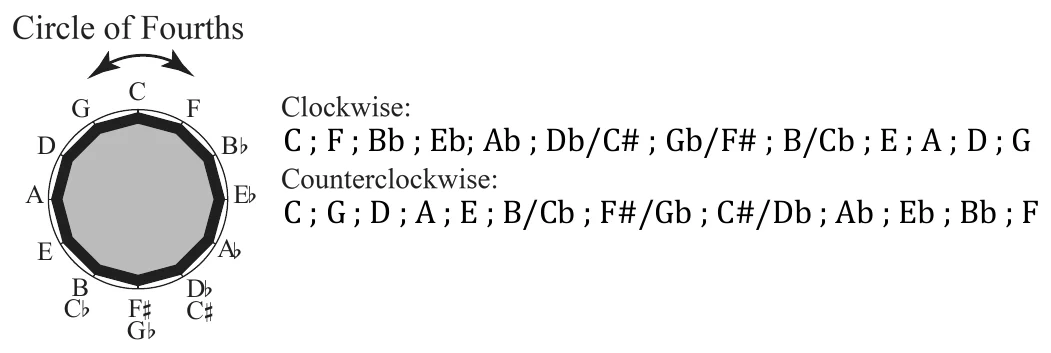
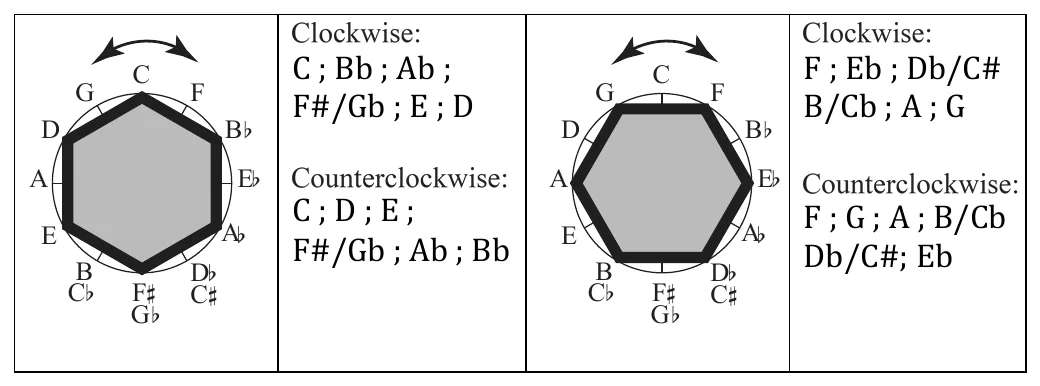
Next we will divide 1 octave into 6, and end up with 2 circles. (12÷6=2) By the way, from here on we will use only the Circle of Fourths in the examples, because both circles give the same results (the students in the back row who don’t believe me are trying it right now, I can see them from here… it’s a good thing, not believing what you haven’t seen with your own eyes…) :
Next we will divide 1 octave into 4, and end up with 3 circles. (12÷4=3) Since we have understood what is going on above anyway, we will say “no more words are needed” and read clockwise and counterclockwise just by looking at the circles:
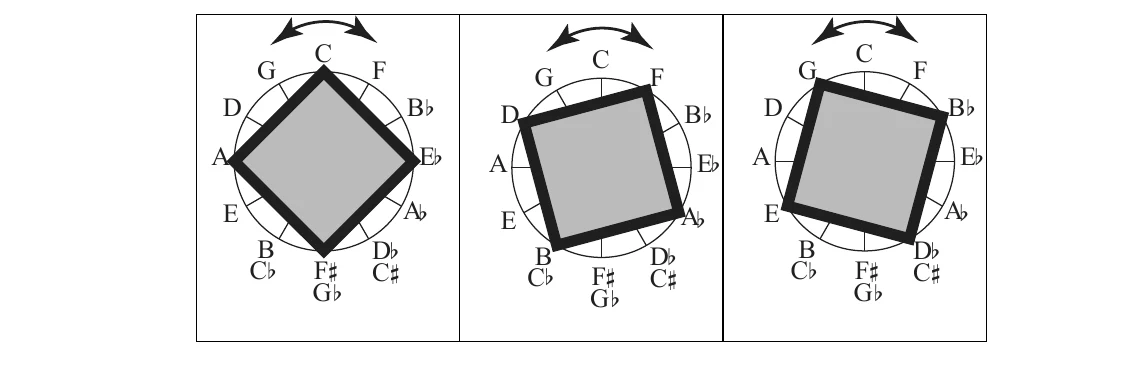
And 12÷3=4, that is:
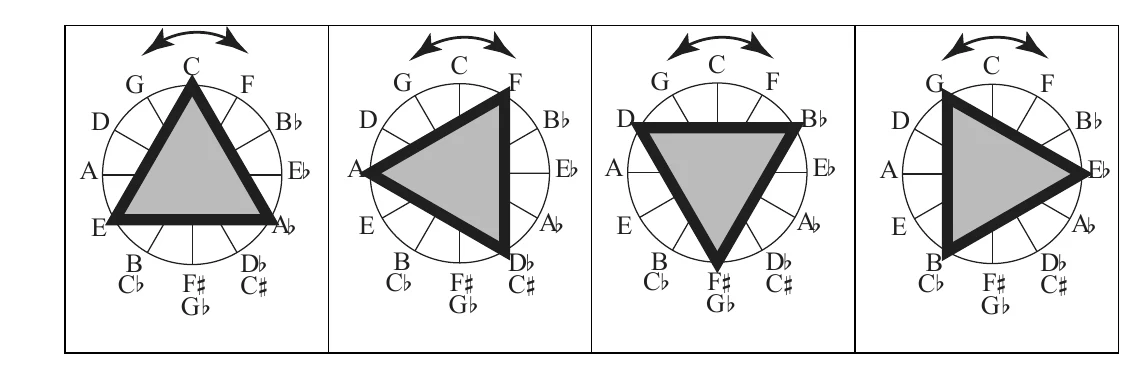
And 12÷2=6, that is:
Let us give an example straightaway, so that the 3 people still reading and bored with this subject can at least be bored with something else:
Say the material we will practice is “Major Triad Arpeggios”. (For those who don’t know triads, or “3-note chords”, here they are: Triads.) As an example, let us practice root movement that divides 1 octave into 3.
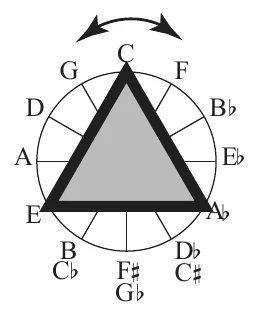
In this circle we ascend counterclockwise, ( C ; E ; Ab) and descend clockwise (C ; Ab ; E).

On the guitar we can begin playing any idea with finger 1, 2, 3 or 4 (that is, with any finger), so even when we play the same notes we can choose different positions, which is one of the main reasons the guitar is so complicated. On top of that, the major-third tuning interval between the G and B strings changes the shapes and makes things even more complicated. In the end, the shapes for playing a major triad on all strings and in all positions, in order, are these:
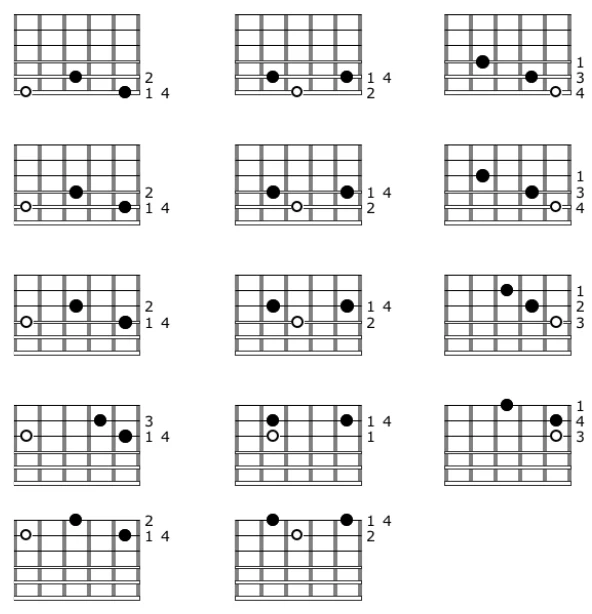
Here the open circles show the roots, and the numbers on the right show suitable finger numbers.
So in this case we can play the example above in many “shapes”:
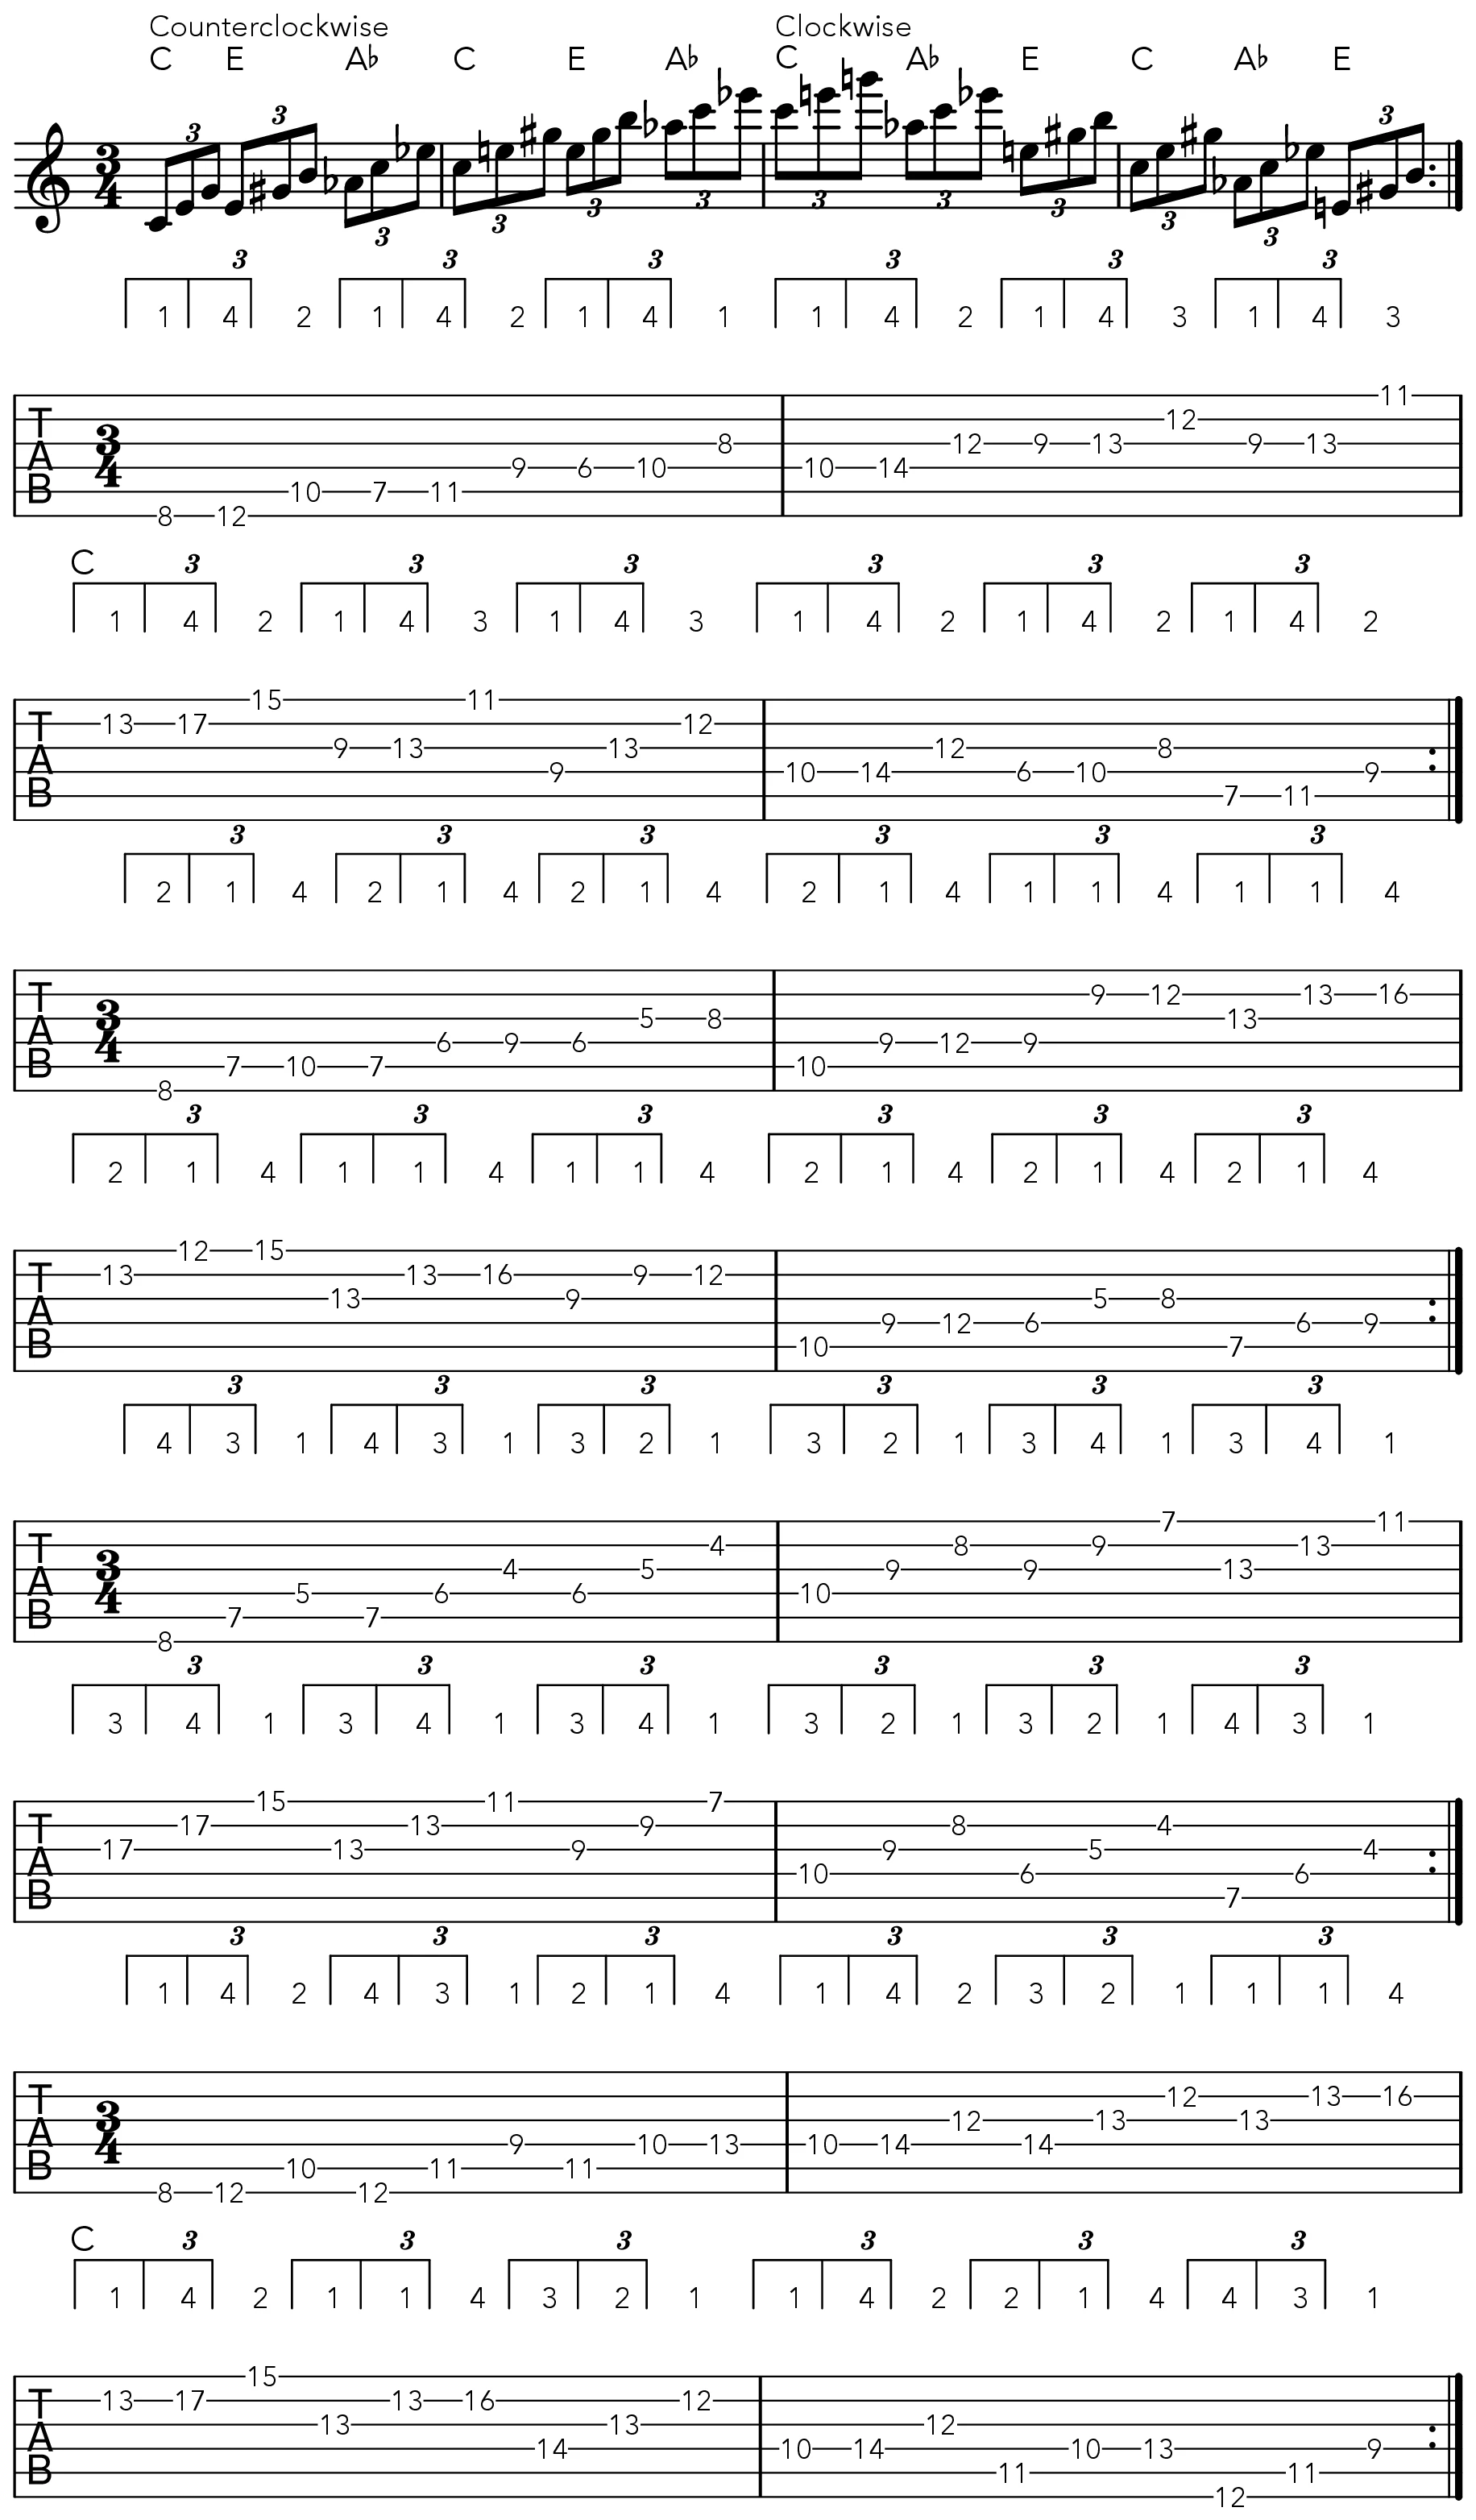
The little numbers above the Tab in the example are finger numbers. In Tab 1., the triad arpeggios always start with finger 1.; in Tab 2., they start with finger 2. wherever possible; in Tab 3., they start with 4 or 3; and in Tab 4., each triad, wherever possible, starts with 1, 2 and 4 in turn.
Yes, of course you aren’t reading this column in the abstract either; you are playing it, and when you play it you understand it, while those who only read without playing are jealous of you because they don’t understand….
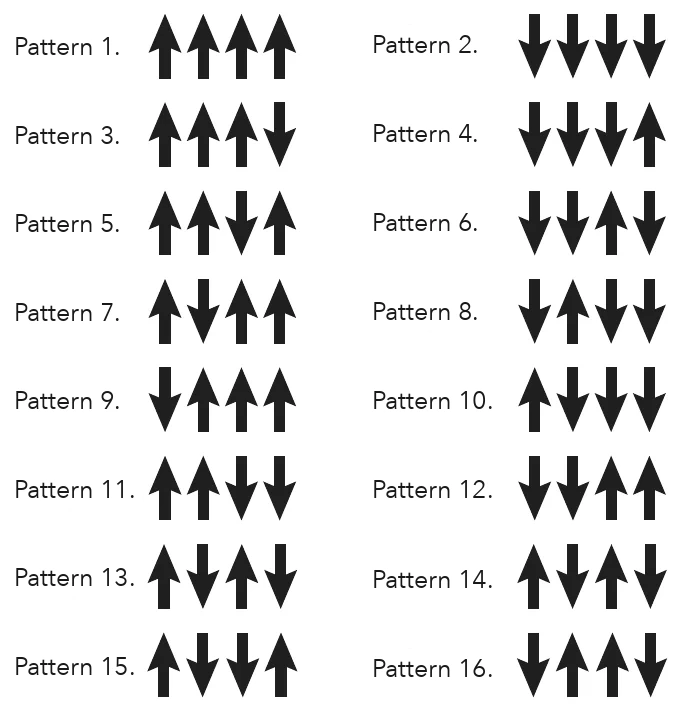
The next step in this whole process is creating variations by changing the direction of the arpeggios systematically. In the example above they all move upward, but with a simple formula we can get “changes of direction” that are great fun to play and give musical results. Let us make a table like this, with up arrows for ascending and down arrows for descending movement:
This is the circle we will use in our examples below.
First we use Pattern 1, then Pattern 7. Here we play 1 octave, but of course there is no reason at all for you not to play 2 or 3 octaves.
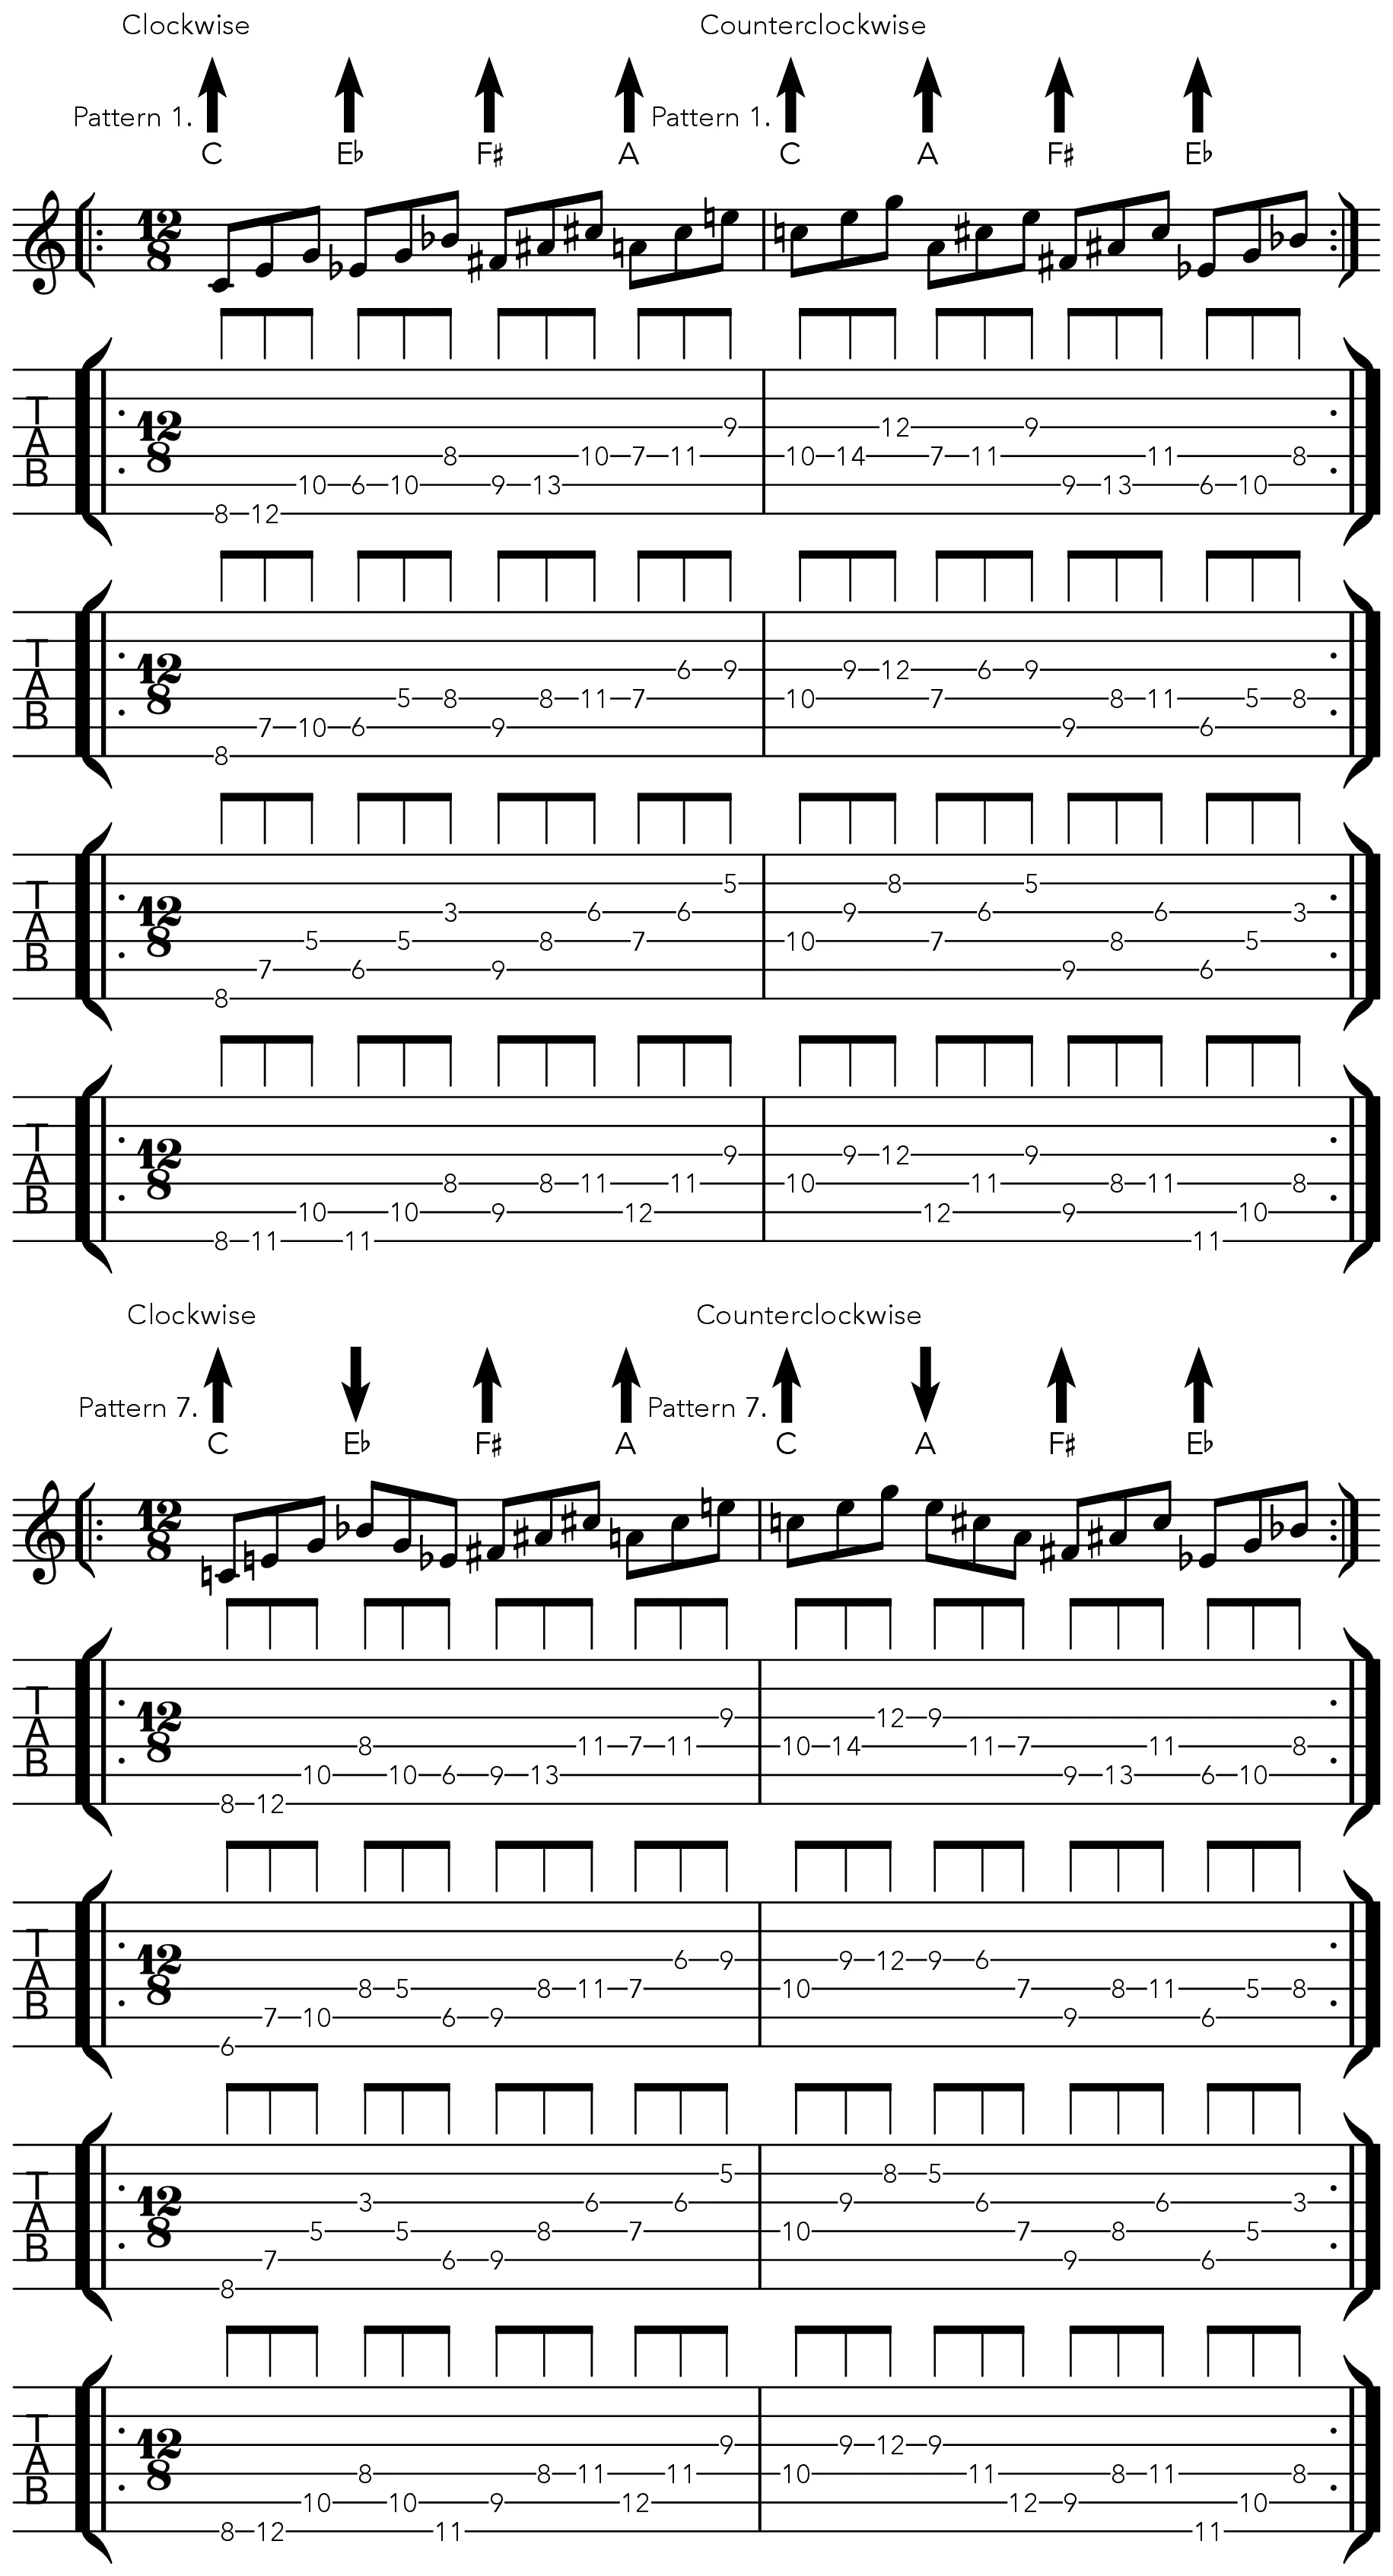
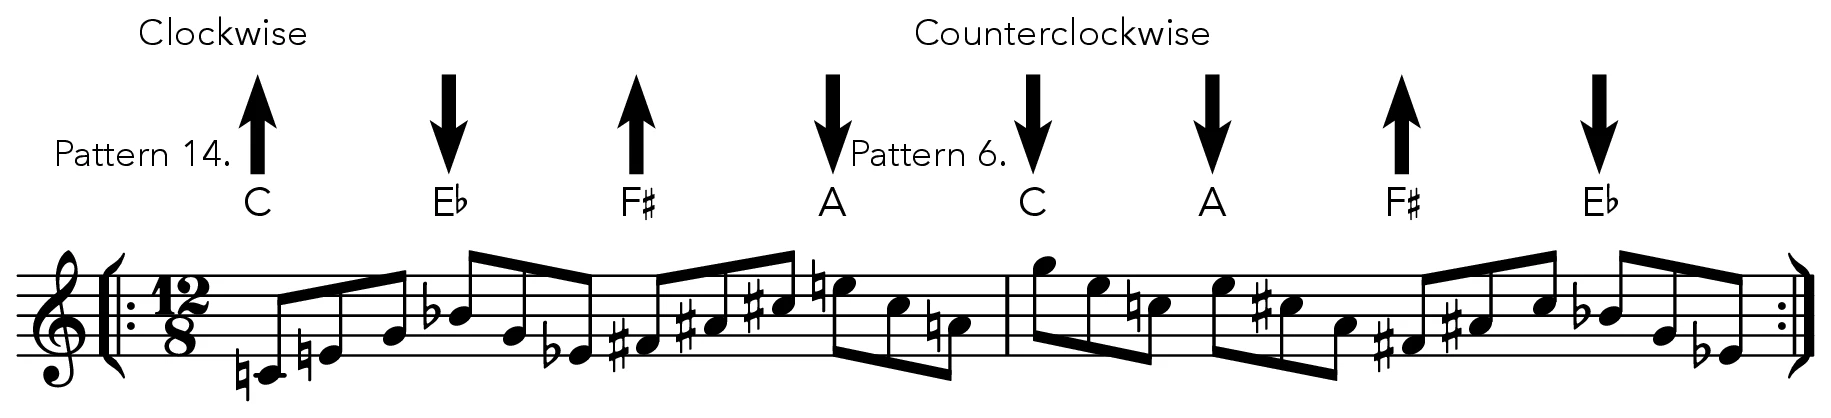
Now that we understand the logic of our Tabs and have memorized our Triad shapes, let us give an example without Tab to save space:
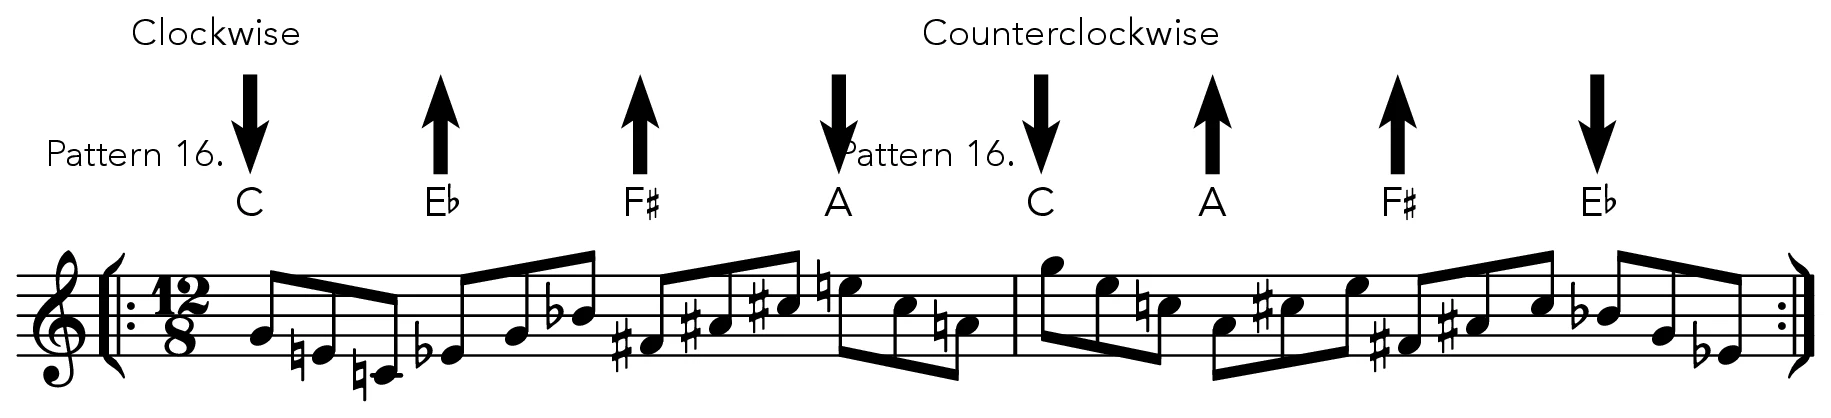
And a random mixture of the lot:
I would like to wrap up the lesson by touching on one last subject: rhythm. So far we have played everything straight because we have 3 notes. Even that is great fun, but couldn’t it become even more fun if we create rhythmic variations? It cooooould….. Since we have 3 notes, let us write some simple random 3-note example rhythms:

And let us apply these rhythms to the ideas above. For example, if we apply rhythm (4). clockwise and rhythm (3). counterclockwise to our latest example:
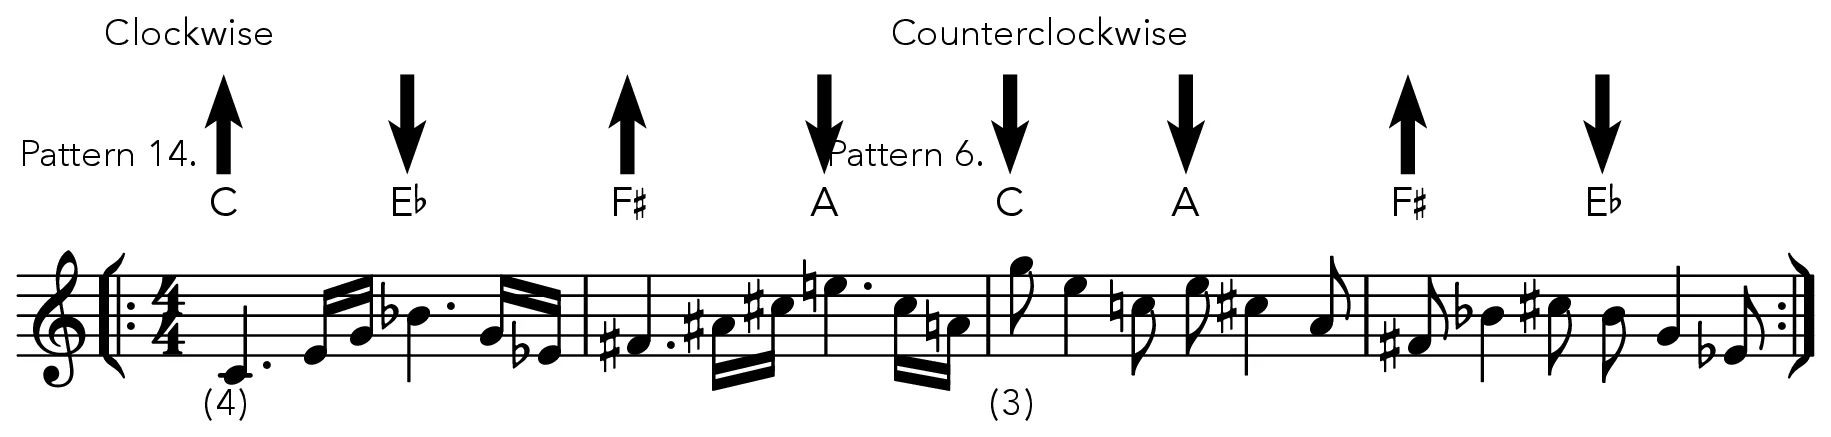
To sum up the whole example:
- We chose the material we will practise
- We learned the positions of our material on our instrument and the possible ways of combining them.
- We chose our circle. (In this example 12÷4)
- We chose our ascending and descending patterns. (In this example Pattern 14 and Pattern 6)
- We chose rhythms to suit our material by writing them. (In this example rhythms 4 and 3)
Does anyone have an idea now of what we can do? If you still have no idea, please leave this page right away ☺. For those leaving, let me give one last ready-made “Main Idea” (Mother Fickir):
- The material we practise can be any scale, chord, arpeggio and so on. All the possibilities of the material (inversions, positions and so on) are learned on the instrument. . (In these examples we played Major Triads in root position. For the practice to be complete we should also have practised the 1st and 2nd inversions. We also played 1 octave but could have played 2-3 octaves. We could also have moved round the circle much more slowly, going up 2 octaves from one key and coming down 2 octaves from the next.)
- Practising all the circles in turn means “all possible root movements” have been practised
- Practising all our ascending and descending patterns in turn means “all possible root movements” have been practised both descending and ascending. And once the “4-arrow” patterns I gave run out, “3-5-6-7… arrow” patterns can be made and practised.
- Rhythms suited to each material, from the simplest to the most complex, can be made up and practised.
- After a while all of this can be practised without looking at the paper, just by thinking; it can bring fluency of thought and technique, then be played on stage, then little by little you can come to admire how the minds of the musicians in the “top league” really work, then…
People generally have two responses to infinity: either they get scared and run away, or they enjoy it and dive in.
I’m off to “fish”. Good luck both to those going “fishing” and to those going to “buy ready-caught fish”…